

Hi there,
Time for another freebie! This modern, fun little pillow is a great quick beginners pattern and the colour combos are endless. Go for some monochrome stripes for a sleek urban look, or go crazy with colour for a fun bright happy decor piece.

The final pillow will measure approx. 35cm high and 51cm across, however this is easily adjustable by using a different weight yarn/hook size. The rainbow pillow pictured above is using 2 strands of 8ply/DK/Number 3 weight yarn and a 5mm hook and measures 30cm by 45cm.
Gauge is not important for this pattern, however when following the pattern I achieved a gauge of 10 stitches across and 12 rows in a 10cm square using a standard Half Double Crochet stitch.

As with the Heart Pillow and Cloud Pillow, I love the fact you can really use any yarn you want, it will obviously just impact the final size if you use a heavier or lighter yarn. For this pattern I have used 2 strands of 10ply/Worsted Weight/Number 4 acrylic yarn held together. There are 2 main reason why I used 2 strands of 10Ply instead of a single strand of chunky yarn.
1. Worsted Weight yarn is very common and cheap yarn, so it is easier to get the colour range that you want, especially if you are wanting to use lots of different coloured stripes.
2. I find that holding 2 strands together creates a stiffer, more dense feel which I find helps the pillow hold its shape more!

This pillow it great for a beginners pattern as there is no fancy stitches at all! No increases or decreases. It is just 3 striped rectangles made of Hdc stitches. A front and back rectangle, which are joined around the edges and stuffed with Hobbyfill, then by pinching the middle and using a thinner rectangle strip you create the bow shape.
The full pattern is below for free, however if you prefer a printable PDF without the Ad's, You can get the download via the below links

If you enjoy this pattern, please check out my other patterns available.
You can also find other free patterns published here.
Striped Bow Pillow
Size;
-
Height – 35cm
-
Width – 51cm
Gauge: Hdc Stitch, 6mm hook
- Stiches per 10cm – 10 stitches across.
- Rows per 10cm – 12 rows.
Materials;
- Yarn; Project is worked doubled stranded with 10ply/Worsted Weight Acrylic. 2x 100grams balls of colour A (Black) and 2x 100gram balls of colour B (White).
- Hook; 6mm or hook to match the yarn weight you are using
- Yarn Needle
- PolyFibre Filling/Hobby Fill
Stitches - US terms;
Sc; Single Crochet
Ch; Chain
Hdc; Half Double Crochet
SlSt; Slip Stitch
Sk; Skip
Notes;
Chain stitches at the end of the row are not included in the stitch count. A number infront of a stitch – e.g 2Hdc – means you work 2 Hdc stitches in the one stitch. A number following a stitch – e.g Hdc 2 – means work a Hdc in each of the next 2 stitches. Sequences between astericks are repeated the number of times shown – e.g *2Sc, Sc* x5
Stitch count is included in brackets after the row instructions.
Lets Start!
Main Panel
Make 2 (Front and Back).
Crocheting with 2 strands of 10ply yarn together.
Starting with colour A
Ch 62
Row 1 – Starting in the third Ch from hook, Hdc 60, Ch 2, turn. (60)
Row 2 – 3 – Hdc 60, Ch 2, turn. (60)

Change to Colour B
Row 4 – 6 – Hdc 60, Ch 2, turn. (60)
Change to Colour A
Row 7 – 9 – Hdc 60, Ch 2, turn. (60)
**Repeat rows 4-9 another 4 times. Skip the Ch 2 on the final row**
You should have 6 Black Stripes and 5 White Stripes

Weave in your ends so they are out of the way, this doesn’t need to be neat as it will sit inside the pillow.
Middle Tie
Crocheting with 2x strands of 10ply together.
Starting with colour A
Ch 51
Row 1 – Starting in the third chain from hook Hdc 49, Ch 2, turn. (49)
Row 2 -3 – Hdc 49, Ch 2, turn. (49)
Change to Colour B
Row 4 – 6 – Hdc 49, Ch 2, turn. (49)
Change to Colour A
Row 7 – 9 – Hdc 49, Ch 2, turn. (49)
**Repeat rows 4-9 another once more. Skip the Ch 2 on the final row**
The middle tie should be approx. 44cm long and 13cm wide.
Tie off and weave in ends.

Lay the 2 Main Panels on top of each other, wrong sides together.

Still working with 2 strands of yarn together, join both panels together with a Single Crochet stitch in colour A, about 23 stitches in from the left as shown in diagram below. Single crochet around all edges until you are about 23 stitches in from the right.


You should have a decent size gap in the center of the top edge.
Pull out a large loop so to not loose any stitches and remove your hook. (or use a stitch holder if you have one)
Fill the pillow up with polyfibre fill, using your hand to evenly distribute the filling. Reinsert your hook and tighten the loop around it. Continue to join the panels together with a single crochet stitch to close the gap. Joining to the first Sc stitch with a SlSt and tie off. Weave in ends.

Take 2 lengths of yarn approx. 3m each and thread onto your yarn needle. Wrap the yarn around either side of the center of the pillow to create a bow shape as shown. Thread the yarn through the side seams to keep them in place.
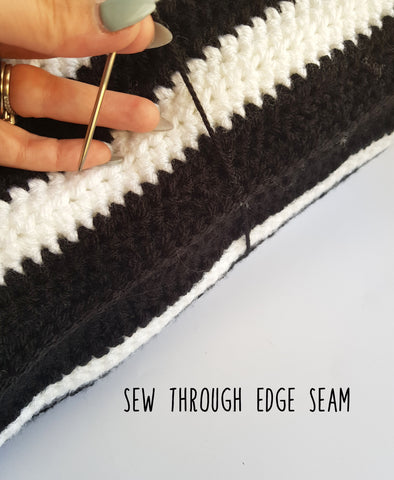

Take your middle tie and lay it over the middle section of the pillow.
Wrap around the pillow so the ends meet at the center back of your pillow. Slip Stitch the edges together. (Or sew together with your yarn needle if preferred.)


Thank you so much for this free pattern! I am 82 and learned to crochet when I was 74. What fun I am having! God bless you for freely sharing your gifts. And Merry Christmas! Sharon
Sharon A Maxwell on