


Hi All,
Do you ever come across a crochet stitch that you just become totally obsessed with? I know I certainly have - The Berry Stitch!

As someone who is totally bobble obsessed, when I can across this 'cheats version' of the stitch I couldn't get enough of it!
I first used this stitch in my Berry Beautiful Pumpkin pattern, which was a massive hit and is now my top selling pattern (I must be onto something here, right?)

So when the time came to start designing up a pattern for the Christmas Season, naturally I wanted to use this again but this time in a stocking. I decided to make 3 versions of this pattern.
- A Standard Sized Stocking
- A Mini Sized Stocking
- A Cabled Stocking


Pictured - Standard, Mini and Cabled Stockings
The free pattern for the Standard and Mini Stocking are below, the cabled version is only available as a PDF download which can be found HERE.
The Stocking is surprisingly simple to make. You start with the toe, working the the round, work the foot, stop the insert the heel, work the leg and then finish with the cuff, which is folded back on itself.

The tie with Pom Poms is optional but allows you to create a loop which can be then used for hanging the stocking up. These stocking would make perfect Christmas décor items hanging from the fireplace, or why not hang the mini stockings from the tree full of candy canes for visitors?

The great thing about this pattern - or any decor item really - is that gauge is not important. If your gauge is slightly out, your final item may just be slightly smaller/larger. It also means you can substitute for any weight yarn! I've used worsted weight yarn as it is slightly chunky, for a warm squishy looking stocking.
The full pattern is below for free, however if you prefer a printable PDF without the Ad's, You can get the download via the below links
If you enjoy this pattern, please check out my other patterns available.
You can also find other free patterns published here.
Berry Beautiful Stocking
Size;
-
Standard - Height – 47cm, Width – 15cm
-
Mini - Height – 22cm, Width – 10cm
Gauge: Pattern for ‘Foot’ – 5.5mm hook
- Stiches per 10cm – 12 stitches across, 14 rows
*Gauge is really not important for this project as it is only a décor item.
Materials;
- Yarn; 10 Ply/Worsted Weight, Number 4 yarn. 150grams. You may wish to have a different colour for the Toe, Heel and Cuff. The pattern will advise when to change colour.
- Hook; 5.5mm and 6mm
- Yarn Needle
- Pom Pom Maker (optional)
- Stitchmarkers
Stitches - US terms;
Sc; Single Crochet
Ch; Chain
Hdc; Half Double Crochet
Dc; Double Crochet
Yo; Yarn Over
SlSt; Slip Stitch
BLO; Back Loop Only
Sk; Skip
Sc2tog; Single Crochet 2 together
W/S; Wrong Side
R/S; Right Side
BrySt; Berry Stitch *Instructions Below*
Notes;
This stocking is made as a simple tube from the toe up. The pattern is worked in back and forward rows but with in each row joined in the round before turning, this ensures a straight seam.
Chain stitches at the end of the row are not included in the stitch count. A number infront of a stitch – e.g 2Hdc – means you work 2 Hdc stitches in the one stitch. A number following a stitch – e.g Hdc 2 – means work a Hdc in each of the next 2 stitches. Stitches in brackets are worked into the same stitch. E.g (Dc, Ch 2, Dc). Sequences between asterisks are repeated the number of times shown – e.g *2Sc, Sc* x5
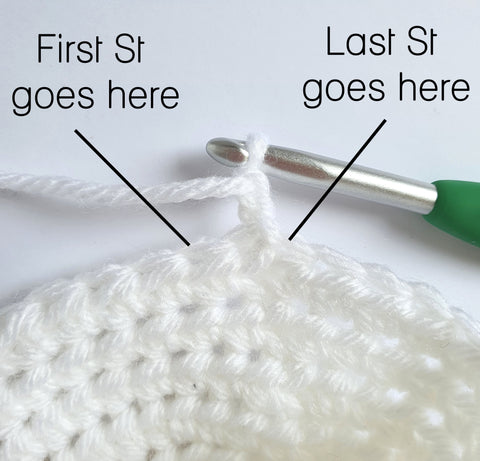
Stitch count is included in brackets after the row instructions. For the toe, heel and cuff, the rows/rounds are worked with the first St of each row worked into the join/bottom of the chain of the previous row.
Pattern comes in 2 sizes – standard size and mini. Pattern is written for standard size with alterations for the mini size in brackets and coloured pink.
Eg –Round 6(4)-8(5) – Hdc 40(24), join, Ch 2.
Photos shown are standard size unless advised otherwise.
Special Stitches
‘Berry Stitch’
The berry stitch is abbreviated as follows in the pattern; BrySt. This stitch is all worked into the one stitch.
‘YO, Insert Hook into St, YO, Pull up Loop, YO, Pull through ONE loop on hook, YO, Insert hook back into St, YO, Pull up loop, YO, Pull through all 5 loops on hook.’
The Berry Stitch is worked on the wrong side of the fabric.


Let's Start!
Toe – worked in rounds
5.5mm hook
*Both Sizes*
Create a magic loop, Ch 1
Round 1 – Working into magic loop, Hdc 8, Join to first St with a SlSt, Ch 2. (8)
Round 2 – 2Hdc in each St, join, Ch 2. (16)
Round 3 – *2Hdc, Hdc* repeat between ** for whole round, join, Ch 2. (24)
Standard size only - Round 4 – *2Hdc, Hdc 2* repeat between ** for whole round, join, Ch 2. (32)
Standard size only - Round 5 – *2Hdc, Hdc 3* repeat between ** for whole round, join, Ch 2. (40)
*Both sizes*
Round 6(4)-8(5) – Hdc 40(24), join, Ch 2. *only Ch 1 at the end of Round 8(5)* [40(24)]

If you are wanting to have different colours for the Toe, Heel and Cuff, fasten off and join with new colour now.
Foot – Worked in joined rows
5.5mm hook
Row 1 (R/S) – Sc 40(24), Join to first St, Ch 2, Turn [40(24)]
Turn work over, for the foot and leg sections you will now join and turn at the end of each row. The First Stitch of a row is worked into the top loop of the last Stitch worked on the previous row, not into the join.
You may wish to use a Stitch marker to mark the beginning of each row to help you keep count.
Row 2 (W/S) - *BrySt, Sc* x20(12), Join to first St, Ch 2, Turn. [40(24)]

Row 3 (R/S) – Sc 40(24), Join to first St, Ch 2, Turn [40(24)]
Row 4 (W/S) - *Sc, BrySt* x20(12), Join to first St, Ch 2, Turn. [40(24)]
Repeat Rows 1 to 4 until you have a total of 18(8) rows. [9(4) Rows of berry stitch and ending with row 2(4)]. Tie off.

Heel – Worked in rows
5.5mm hook.
If you are wanting to have different colours for the Toe, Heel and Cuff, Change colours now.
On the Right Side, count 19(11) stitches to the right of the seam. Join.
Row 1 (R/S) – Sc 19(11), Ch 1, Turn [19(11)]
Row 2 (W/S) – Sc2tog, Sc 15(7), Sc2tog, Ch 1, Turn. [17(9)]
Row 3 – 8(4) – Sc2tog, Sc until last 2 stitches, Sc2tog, Ch 1, Turn. (Row 8(4) will have 5 St’s)
Row 9(5) – Sc 5, Ch 1, Turn. (5)
Row 10(6)-16(8) – 2Sc, Sc till last St, 2Sc, Ch 1 Turn. (Row 16(8) will have 19(11) St’s)
Tie off with a 20cm Tail for sewing.

Fold Heel in half towards you with the right sides together. Sew the 2 edges together with a yarn needle.

Flip the heel right side out.

Leg – Worked in joined Rows
5.5mm hook.
If you are wanting to have different colours for the Toe, Heel and Cuff, Change colours now.
For the leg you are just going to continue on with the same pattern as the foot section.
On the right side, Join in the first stitch to the left of the seam.
Row 1 - (R/S) – Sc 40 (24)– going around the heel. Join to first St, Ch 2, Turn. [40(24)]
TIP* - when you reach the corner of the foot and heel, you may find a gap is created. You can either close this gap afterwards by sewing closed with spare yarn or you can pick up an extra stitch in the corner and work a Sc2tog, instead of a Sc stitch so you still have the correct stitch count for the row.


Row 2 (W/S) - *BrySt, Sc* x20(*Sc, BrySt* x12), Join to first St, Ch 2, Turn. [40(24)]
Row 3 (R/S) – Sc 40(24), Join to first St, Ch 2, Turn [40(24)]
Row 4 (W/S) - *Sc, BrySt* x20(*BrySt, Sc* x12), Join to first St, Ch 2, Turn. [40(24)]
Row 5 (R/S) – Sc 40(24), Join to first St, Ch 2, Turn [40(24)]
Repeat Rows 2 – 5 until you have a total of 26(10) Rows (13(5) Berry St rows) ending on a Row 2.
Row 27(11) (R/S) – Sc 9(5), 2Sc, Sc 19(11), 2sc, Sc 10(6), Join to first St. Do not tie off unless changing colour [42(26)]
Stocking will measure approx. 13.5inches/34cm(6.5inches/17cm) at this point.

If you are wanting to have different colours for the Toe, Heel and Cuff, fasten off and join with new colour now.
Cuff – Worked in rows
Change to a 6mm hook
Ch 28(17)
Row 1 – Starting in 2nd chain from hook, Sc 27(16), SlSt into join and 1st St to the left along the top of the leg section. Turn.

Row 2 – Skipping the 2 SlSt, Sc 27(16) in the BLO. Ch 1, Turn.

Row 3 – Sc 27(16) in BLO, SlSt into the next 2 stitches of the leg, Turn.
Repeat Rows 2 and 3 all the way around the top of the leg, finishing with a Row 3 and a single SlSt into the remaining leg St.

Line up edges with wrong sides together and SlSt the seam closed. Fold cuff back in half. (Seam will be hidden)

Tie
Create a tie approximately 50(32)cm long. I prefer to use a chainless single crochet foundation stitch, but you also just create a long chain and Sc in each chain along. Tie off, leaving tails approx. 10cm to tie on the Pom Poms.
Fold the tie in half and use a crochet hook to pull the middle through the top edge of the cuff to create a loop for hanging. Tie the 2 ends of the tie together to hold in place.

Attach the Pom Poms and you’re finished!

I love this pattern so much, I keep coming to it because of the heel part, it’s just so easy to do and understand. I did both the normal version with worsted weight yarn and then I tried to do the mini version with sport weight yarn and it fits me great. It’s easily adaptable and you can change the berry stitch for any other stitch you want.
Héctor Del Real López on