

Hi There!
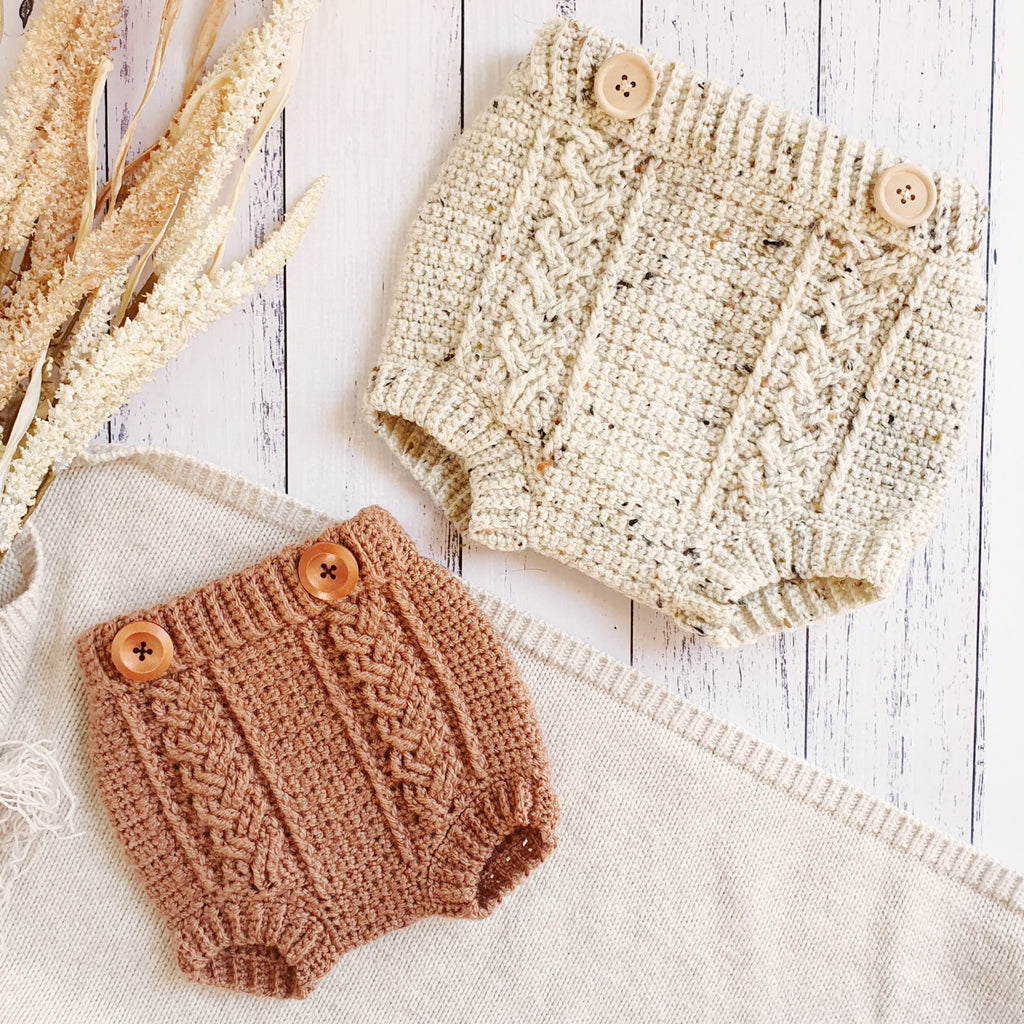
Today I'm very pleased to be sharing this gorgeous bloomer pattern with you all. This pattern has been available as a free pattern on Bella Coco's website for the last 3 months and is now also available here and as a PDF download.

I designed these bloomers up off the back of my Isabella Bloomers, which were a huge success but the demand for a unisex design was there. Being a big fan of cables, it didn't take long to put my design into action.

These bloomers are made in a 8ply yarn - wool or acrylic looks best. These are design to have that warm, cozy sweater feel to them.
My favourite feature of these bloomer is the waistband - its actual elastic!! The waistband is designed to be folded over actual elastic. Perfect fit everytime without uncomfortable strings or ties!

The full pattern written out below in a condensed format for FREE, however if you prefer a printable PDF without the Ad's (Also includes more detailed instructions and colour coded sizes), you can also get the download via the below links as usual!
If you enjoy this pattern, please check out my other patterns available.
You can also find other free patterns published here.
Let start!
Frankie Bloomers
Sizes;
- NB – A; 14cm, B; 17cm, C; 20cm
- 0-3m – A; 16cm, B; 18cm, C; 24cm
- 3- 6m – A; 17cm, B; 20cm, C; 25cm
- 6 -12m – A; 18cm, B; 21.5, C; 26.5cm
- 1y – A; 19cm, B; 23cm, C; 27.5cm
- 2y – A; 20cm, B; 24cm, C; 29cm

Gauge; Sc swatch 4mm hook
10cm x 10cm = 19 Stitches across and 23 rows.
Materials;
- Yarn; 8Ply, DK, Number 3 Acrylic Yarn. I used Stylecraft Special DK or Paintbox DK Acrylic. Need approx. 150grams for NB-6m sizes. 200grams for 12m to 2y.
- Hook; 4mm, or hook to obtain gauge. (If you are a looser crocheter you will likely need to go down to a 3.5mm).
- Yarn Needle
- Optional – Elastic 2cm wide, up to 50cm long depending on pattern size, sewing needle and thread.
Abbreviations used in this pattern; US Terms
Sc - Single Crochet
Ch - Chain
Dc - Double Crochet
SlSt - Slip Stitch
YO - Yarn Over
BLO - Back Loop Only
FLO - Front Loop Only
Sk - Skip
Sc2tog -Single Crochet 2 Together
W/S - Wrong Side
R/S - Right Side
FpDc - Front Post Double Crochet
(YO, insert hook under stitch, pull up loop, *YO, pull through 2 stitches* 2x)
FpTr - Front Post Triple/Treble
(YOx2, insert hook, pull up loop, *YO, pull through 2 stitches* - 3x)
Notes;
Bloomers are worked with the ribbing worked flat, joined in the round then folded in half (around elastic if required). Bloomers are then worked top down in back and forward rows, joining in the round as you go with a slip stitch until the leg holes. Back and front sections are then worked flat and joined at the crotch. Finishing with the leg hole ribbing and buttons.
Chain stitches at the end of the row are not included in the stitch count. A number in front of a stitch – e.g 2Hdc – means you work 2 Hdc stitches in the one stitch. A number following a stitch – e.g Hdc 2 – means work a Hdc in each of the next 2 stitches. Stitches in brackets are worked into the same stitch. E.g (Dc, Ch 2, Dc). Sequences between asterisks are repeated the number of times shown – e.g *2Sc, Sc* x5. Stitch count is included in brackets after the row instructions.
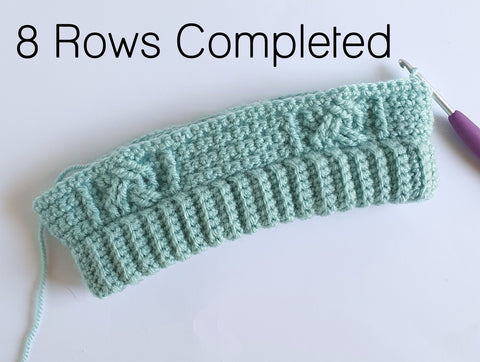
The cable itself is made up of a double stranded braid with a single FpDc border. It is created by first creating a foundation set, Sc row and then a repeat of 4 Rows*(rows 4-7).
Row 2 - Foundation Set
Row 3 - Sc all
Row 4 - *Cable Set ‘A’
Row 5 - Sc all
Row 6 - Cable set ‘B’
Row 7 – Sc All*
The cable is slightly different for sizes NB, 0-3m and 3-6m, so make sure you are following the correct cable instructions. Photos shown are size 0-3m unless stated otherwise.
Cable instructions are condensed in the free version of the pattern below. A full PDF with more detailed instructions is available to download.
If you have any problems, issues or questions about this pattern, please contact me at peachnpaige@gmail.com

Waist Ribbing
NB, (0-3m, 3-6m, 6-12m, 1T, 2T)
Pattern is written for NB size with the other sizes in brackets.
Fits waist 38cm (45cm, 47cm, 48cm, 50cm, 52cm)
Chain 14(14, 16, 16, 18, 18)
Row 1 - Starting from the second chain from the hook, Sc 13(13, 15, 15, 17, 17), Ch 1, turn. [13(13, 15, 15, 17, 17)]
Row 2 - 62(76, 84, 88, 92, 96)– In the BLO; Sc 13(13, 15, 15, 17, 17), Ch 1, Turn. [13(13, 15, 15, 17, 17)]
Do not chain 1 before turning on final row.

Without removing hook, bring the other end of the strip in front of your work and fold in half, lining up the ends. Slip Stitch ends together through the starting chain and BLO of the last row worked.

If inserting elastic - Take your length of elastic and cut to size to fit. You will want the elastic to be approx. 3cm shorter than the waist measurement. This pattern is based on a waist measurement of approx. 38cm(45cm, 47cm, 48cm, 50cm, 52cm) so you will want your elastic to be 36cm(43cm, 45cm, 46cm, 48cm, 50cm) long. Overlap the ends by approx. 1cm and sew together.
Turn work horizontal, leaving the seam facing out. Slide your ring of elastic over the waistband ribbing.

Fold waistband ribbing in half over the elastic, lining up both ends of the seam.
Upper Body
NB, (0-3m, 3-6m, 6-12m, 1T, 2T)
Pattern is written for NB size with the other sizes in brackets.
Round 1 - Working along the edge of the ribbing, Chain 1, Sc 62(76, 84, 88, 92, 96) through both layers to encase the elastic. Join to first stitch in row with a SlSt, Ch 1. Turn. This is 1 Sc for every row of ribbing. [62(76, 84, 88, 92, 96)]
If you do not want to use elastic, complete the same above steps without the elastic.


The remaining rounds in the Upper Body section are all worked in back and forward rows joined with a SlSt in the round before turning over. The first stitch of each row is worked into the last stitch of the previous row.
Round 2 (W/S) -
NB *2Sc, Sc* x16,
0-3m *2Sc, Sc* x9, Sc 2, *2Sc, Sc* x9,
3-6m *2Sc, Sc* x4, Sc 3, *2Sc, Sc* x4, Sc 4, *2Sc, Sc* x4, Sc 3, *2Sc, Sc* x4,
6-12m *2Sc, Sc* x4, Sc 3, *2Sc, Sc* x5, Sc 2, *2Sc, Sc* x5, Sc 3, *2Sc, Sc* x4,
1T *2Sc, Sc* x7, Sc 3, *2Sc, Sc* x6, Sc 3, *2Sc, Sc* x7,
2T *2Sc, Sc* x5, Sc 3, *2Sc, Sc* x5, Sc 2, *2Sc, Sc* x5, Sc 3, *2Sc, Sc* x5,
Round 2 continued - All Sizes; Sc 11(12, 12, 14, 15, 15), *Sc in FLO, Sc in BLO* x4(7,9, 8, 8, 9), Sc 11(12, 12, 14, 15, 15), Join to first stitch with a Slst, Ch 1, Turn over and work back the otherway. [78(94,100, 106, 112,116)]
Round 3 (R/S) - Sk SlSt, Sc 1(2, 2, 2, 3, 3), (Work the Foundation Set), *Sc in BLO, Sc in FLO* x4(7,9, 8, 8, 9), (Work another Foundation Set), Sc 49(58, 60, 64, 69, 71), Join with SlSt, Ch 1, Turn. [78(94,100, 106, 112,116)]
Foundation Set; NB, 0-3m and 3-6m; FpDc into the Sc St directly below in Row 1 (2 rows below), Sc 1, FpTr into Row 1, into the 4th and 5th St to the left of the first Sc worked into. FpTr into the 2nd and 3rd stitch to the left of the first Sc worked in Row 1, crossing over the front of the last 2 FpTr, FpDc into the 6th and 7th stitches to the left of the first St worked in Row 1, Sc 1, FpDc into Sc directly below in Row 1. (10 Stitches worked.)
Foundation Set; 6-12m, 1T, 2T; FpDc into the Sc St directly below in Row 1 (2 rows below), Sc 1, FpTr into Row 1, into the 5th and 6th St to the left of the first FpDc. Sc 1, FpTr into the 2nd and 3rd stitch to the left of the first FpDc, crossing over the front of the last 2 FpTr, Sc 1, FpDc into the 8th and 9th stitches to the left of the first St worked in Row 1, Sc 1, FpDc into Sc directly below from Row 1. (12 Stitches worked)
** The photos in these cable instructions are not from these bloomers, but from a design which uses the same braided cable pattern as the 6-12m, 1T and 2T sizes but using longer stitches, this makes the photos much clearer. Sizes NB, 0-3m and 3-6m uses the exact same order of stitches, just condensed over 10 stitches, not 12. **


Row 4 (W/S) - Sk SlSt, Sc 59(68, 70, 76, 81, 83), *Sc in FLO, Sc in BLO* x4(7,9, 8, 8, 9). Sc 11(12, 12, 14, 15, 15), Join with SlSt, Ch 1, Turn. [78(94,100, 106, 112,116)]
Note; Make sure when working the w/s rows, you are working into the top of the Front Post Stitches and not the unworked stitches from the previous row.

Row 5 (R/S) - Sk SlSt, Sc 1(2, 2, 2, 3, 3), (Work Cable Set A), *Sc in BLO, Sc in FLO* x4(7,9, 8, 8, 9), (Work another Cable Set A), Sc 49(58, 60, 64, 69, 73) Join with SlSt, Ch 1, Turn. [78(94,100, 106, 112,116)]
Cable Set A; NB, 0-3m and 3-6m; FpDc into single FpDc below, Sc 1, Work a FpDc into each of the first 2 FpTr from the last set, FpTr into the pair of FpDc from the last set, go back and work a FpTr into each of the FpTr you just skipped over, going underneath the last 2 FpTr you created, Sc 1, FpDc into the single FpDc below (10 Stitches worked)
Cable Set A; 6-12m, 1T, 2T; FpDc into single FpDc below, Sc 1, Work a FpDc into each of the first 2 FpTr from the last set, Sc 1, FpTr into the pair of FpDc from the last set, Sc 1, go back and work a FpTr into each of the FpTr you just skipped over, going underneath the last 2 FpTr you created, Sc 1, FpDc into the single FpDc below (12 Stitches worked)


Row 6 (W/S) – Repeat Row 4
Row 7 (R/S) - Sk SlSt, Sc 1(2, 2, 2, 3, 3), (Work Cable Set B), *Sc in BLO, Sc in FLO* x4(7,9, 8, 8, 9), (Work another Cable Set B), Sc 49(58, 60, 64, 69, 73), Join with SlSt, Ch 1, Turn. [78(94,100, 106, 112,116)]
Cable Set B; NB, 0-3m and 3-6m; FpDc into single FpDc below, Sc 1, Work a FpTr into each of the first 2 FpTr from the last set, skipping over the FpDc, crossing back over in front, work a FpTr into each of the FpDc you skipped, work a FpDc into the final pair of FpTr, Sc 1, FpDc into the single FpDc below (10 Stitches worked)
Cable Set B; 6-12m, 1T, 2T; FpDc into single FpDc below, Sc 1, Work a FpTr into each of the first 2 FpTr from the last set, skipping over the FpDc, Sc 1, Crossing back over in front, work a FpTr into each of the FpDc you skipped, Sc 1, Work a FpDc into the final pair of FpTr, Sc 1, FpDc into the single FpDc below (12 Stitches worked)


Repeats Rows 4-7 until you have a total of 23 (25, 27, 29, 31, 33) rows, ending with Row 7 (5, 7, 5, 7, 5)
Upper body section (excluding ribbing) should measure approx. 10cm (11, 11.5, 12, 13, 14). Tie off and weave in ends. Last row worked is on the RIGHT side.

Back Panel
Working on the wrong side of the fabric, join yarn in 4th (5th, 5th ,5th ,6th ,7th) stitch left of the join. Ch 1.
Row 1 - Sc in join, Sc 41 (47,49, 53, 55, 57), Ch 1, Turn. [42(48,50, 54, 56, 58)] Place a stitch marker in the last stitch worked in this row.
Row 2 - 6 (7, 11, 10, 13, 13) Sc2tog, Sc until last 2 stitches in row, Sc2tog, Ch 1, Turn.
Row 7(8, 12, 11, 14, 14) - 11 (13, 15, 15, 17, 17) – Sc2tog, Sc2tog, Sc until last 4 Stitches in Row, Sc2tog, Sc2tog, Ch 1, Turn.
Sizes; NB (0-3m, 6-12m, 2T)
Row 12(14, 16, 18) – Sc2tog, Sc 8(10, 12), Sc2tog, Tie off. [10(12, 14, 16)]
Sizes; 3-6m (1T)
Row 16 (18) - Sc 6(7), Sc2tog, Sc 6(7), Tie off. [13 (15)]

Front
This can be a bit tricky, you will be continuing to work the cable pattern as before, however you will be decreasing into them so you will only be able to complete part of the cables. ‘Work in Pattern’ means to continue working your cable sets and FLO and BLO Stitches in between the decreases to keep the pattern going. For example; Size 1T;
Complete the Sc2tog, Sc2tog. You can see there is still 7 Stitches left of the cable set.

I will work just the last 7 stitches of the cable set before working the FLO and BLO section. I will repeat the same of the other side.

Working on the wrong side of the fabric, find the stitch marker you placed earlier.
Join yarn in the 5th (7th,8th ,9th ,9th ,10th) stitch to the left of the stitch marker. Ch 1.
Row 1 –Starting with joining stitch, Sc2tog, Sc 8(8, 7, 8, 10, 9), *Sc in BLO, Sc in FLO* x4(7,9, 8, 8, 9), Sc 8(8, 7, 8, 10, 9), Sc2tog, Ch 1, Turn. [26 (32, 34, 34, 38, 38)]
Row 2 - 3(4, 4, 3, 4, 4) – Sc2tog, Sc2tog, ‘Work in Pattern’ until last 4 Stitches, Sc2tog, Sc2tog, Ch 1, Turn. [18(20, 22, 26, 26, 28)]
Row 4 (5, 5, 4, 5, 5) - 7(8, 8, 9, 9, 9) - Sc2tog, ‘Work in Pattern’ until last 2 stitches, Sc2tog, Ch 1, Turn. [10(12, 14, 14, 16, 16)]
Row 8 (9, 9, 10, 10, 10) - 11(12, 12, 14, 14, 16) – Sc 1, ‘Work in Pattern’ till last stitch, Sc 1, Ch 1, Turn. [10(12, 14, 14, 16, 16)]
Sizes; NB (0-3m, 6-12m, 2T)
Tie off, leave a 30cm tail
Sizes; 3-6m (1T)
Row 13 (15) – Sc 6(7), Sc2tog, Sc 6(7). Tie off, leave a 30cm tail. [13(15)]

Turn the bloomers inside out and line up the crotch seams. Sew together using the tail. Remove stitch marker.
Flip bloomer back right side out. Sew in your ends.
Leg Holes
Join yarn at one end of the crotch seam and Sc 33 (39, 43, 47, 49, 51) around the leg hole.
Note; You will need to try and evenly space your stitches out as there is no clear place to put each stitch. You don’t need to have exactly the above number, just make sure both leg holes are the same.
Join to first Sc with a SlSt. Ch 5 (5, 6, 6, 7, 7).
Row 1; Starting in second chain from hook, Sc 4 (4, 5, 5, 6, 6) down the Ch. SlSt into the leg hole edge, in both the 1st and 2nd stitch to the left of the join as shown. Turn. [4(4, 5, 5, 6, 6)]

Row 2; Skip the 2 SlSt you just did and Sc 4 (4, 5, 5, 6, 6) back up the ribbing in the BLO. Ch 1, Turn. [4(4, 5, 5, 6, 6)]
Row 3; Sc 4 (4, 5, 5, 6, 6) in BLO, SlSt into the next 2 Sc edge stitches like you did in Row 1, Turn. [4(4, 5, 5, 6, 6)]
Repeat Rows 2 and 3 all the way around the leg hole. SlSt into the first stitch again and with right sides together, SlSt or sew the ribbing ends together. Tie off and sew in tails. Repeat for second leg hole.


Sew 2x buttons into the waistband lining up with the cables.
And you’re finished!
Super cute pattern!! Just made these adorable bloomers for the first time and followed the NB size but ended up being more like 6-12m size by the time I finished haha. Not quite sure how they turned out so big since I used 8ply and 4mm hook and am a tighter crocheter but it’s my own fault for not doing a tension swatch. Still super cute!
Mel on