

Hi!
With spring underway for most of you in the Northern part of the world, I felt it was a great time to re-release one of my original patterns as a free blog post - The Boho Crop Top!

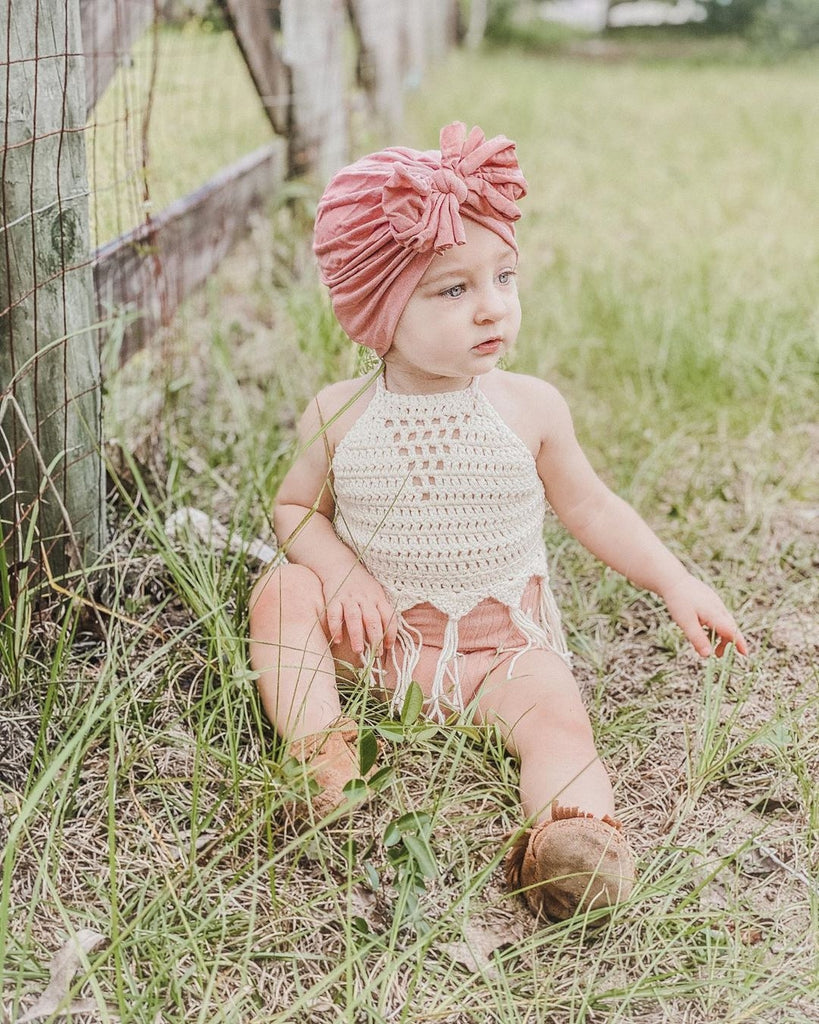
This top is beautifully simple, a basic triangle design which is tapered to shape the body, eyelet details in the neckline, a boho trim and ties around the neck and back. Because this top is so adjustable I have only written the pattern for 4 sizes - Baby (6-12m), Toddler (1-3y), Young Child (4-7y), Older Child (7-10y).

As is the case with most summery tops, this design is made up in a cotton yarn - light, airy and breathable. I have a rather tight gauge, particularly with my earlier patterns, and used a 8ply (Number 3) weight yarn and a 4mm hook but you may find a 3.5mm hook suits better.

The full pattern is written out below for FREE, however if you prefer a printable PDF without the Ad's, you can get the download via the below links as usual!
If you enjoy this pattern, please check out my other patterns available.
You can also find other free patterns published here.
Let's Begin!
Boho Crop Top
|
Sizes |
Panel Height ( excluding edging ) |
Panel Width (excluding edging) |
|
6m -12m |
12cm |
27cm |
|
1-3y |
15.5cm |
30.5cm |
|
4-6y |
19cm |
37.5cm |
|
7-10y |
24.5cm |
47cm |
Gauge: Dc Stitch
10cm x 10cm = 18 Stitches across and 11 rows.
Materials:
- Yarn; 8Ply, DK, Number 3 Cotton Yarn.. Need approx. 100grams for 6m-3y sizes. 150grams for 4-10y.
- Hook; 3.5mm, or hook to obtain gauge.
- Yarn Needle
Abbreviations - US Terms;
- Dc - Double Crochet Crochet
- SlSt - Slip Stitch
- Ch - Chain
- Dc2tog - Double Crochet 2 Together
- Sk - Skip
- St - Stitch
Notes;
Top is worked in rows from the bottom up with the ties and edging added last. Due to the nature of the design the fit is easily adjusted.
Chain stitches at the end of the row are not included in the stitch count. A number infront of a stitch – e.g 2Hdc – means you work 2 Hdc stitches in the one stitch. A number following a stitch – e.g Hdc 2 – means work a Hdc in each of the next 2 stitches. Sequences between astericks are repeated the number of times shown – e.g *2Sc, Sc* x5
Stitch count is included in brackets after the row instructions. Photos shown are all size 0-3m unless advised otherwise.
Ties are made by creating a Chainless Single Crochet Foundation Row. If you are not familiar with this stitch you can find tutorials on line. Alternatively you can create a chain and Sc along it.
All Photos are located at the end of this blog by photo reference.
Size 6-12m
Top Panel
Row 1 – Using the Single Crochet Chainless Foundation Stitch, Stich 49 stitches across, Ch 2, Turn. (49)
Row 2 - 3 – Dc2tog, Dc2tog, Dc until last 4 St’s, Dc2tog, Dc2tog, Ch 2, Turn. (41)
Row 4 - 6 – Dc2tog, Dc until last 2 St’s, Dc2tog, Ch 2, Turn. (35)
Row 7 – Dc2tog, Dc 15, Ch 1, Sk 1, Dc 15, Dc2tog, Ch 2, Turn. (33)
Row 8 – Dc2tog, Dc 13, Ch 1, Sk 1, Dc in Ch gap from previous Row, Ch 1, Sk 1, Dc 13, Dc2tog, Ch 2, Turn. (31)
(See Photos 1 & 2)
Row 9 – Dc2tog, Dc2tog, Dc 9, *Ch 1, Sk 1, Dc in gap*, repeat between ** again, Ch 1, Sk 1, Dc 9, Dc2tog, Dc2tog, Ch 2, Turn. (27)
Row 10 – Dc2tog, Dc2tog, Dc 6, *Ch 1, Sk 1, Dc in gap*, repeat between ** twice more, Ch 1, Sk 1, Dc 6, Dc2tog, Dc2tog, Ch 2, Turn. (21)
Row 11 – Dc2tog, Dc2tog, Dc 3, * Ch 1, Sk 1, Dc in gap*, repeat between ** 3 more times, Ch 1, Sk 1, Dc 3, Dc2tog, Dc2tog, Ch 2, Turn. (17)
Row 12 – Dc2tog, Dc2tog, *Ch 1, Sk 1, Dc in gap*, repeat between ** 4 more times, Dc2tog, Dc2tog, Ch 2, Turn. (15)
Row 13 – Dc2tog, Dc 11, Dc2tog, Tie off. (13)
Edging
Turn top upside down and join in the first stitch on the right. Ch 2.
Row 1 – Dc all stitches in original foundation row, Ch 2, Turn. (49)
Row 2 – *Sc, Sk 2, (Dc 4, Ch 2, Dc 4) in same stitch, Skip 2*, Repeat between ** 7 more times, end with an Sc.
(See Photos 3 & 4)
Ties
To create the ties, create a single crochet chainless foundation stitch until the stitch is 17 inches long.
To attach to the bodice, insert hook into chain as if to start creating another foundation stitch, YO, pull up loop, YO and pull through first loop on hook – You will have 2 loops on hook.
With right side up, insert hook into the stitch in the top left corner of the top, YO, pull up loop, YO and pull through first 2 loops on hook. Insert hook back into same stitch in the top, YO, pull up loop, YO and pull through all 3 loops on the hook.
Insert hook into next stitch down the side of the top and continue to Sc down the edge of the top until you reach row 1 of the Top Panel. (See Photo 5)
To separate from top into tie - Insert hook back into the last stitch you did a Sc in, YO and pull up loop. YO and Pull through 1 loop, YO and pull through both loops. You will now see you have the beginning of a foundation stitch ready for you to create your second tie from.
(See Photo 6)
Continue chainless foundation stitch until tie is 17 inches long. Repeat on the other side, starting at the right bottom corner of the top and working up the other side. Weave in your ends.
Fringe
Cut 24 lengths (=3 lengths for each point. For fuller tassels, increase to 4 or 5 lengths per point) at 2x the length you want your tassels to be. My lengths measure 20cm. Take 3 lengths, fold in half and use your hook to pull through the gap in the point of your edging. Pull the ends through this loop and pull tight to secure. Repeat for each point. Trim the ends to neaten up.
(See Photos 7 - 10)
And you are Finished!
Size 1-3y
Top Panel
Row 1 – Using the Single Crochet Chainless Foundation Stitch, Stich 55 stitches across, Ch 2, Turn. (55)
Row 2 - 3 – Dc2tog, Dc2tog, Dc until last 4 St’s, Dc2tog, Dc2tog, Ch 2, Turn. (47)
Row 4 - 8 – Dc2tog, Dc until last 2 St, Dc2tog, Ch 2, Turn. (37)
Row 9 – Dc2tog, Dc 16, Ch 1, Sk 1, Dc 16, Dc2tog, Ch 2, Turn. (35)
Row 10 – Dc2tog, Dc 14, Ch 1, Sk 1, Dc in Ch gap from previous Row, Ch 1, Sk 1, Dc 14, Dc2tog, Ch 2, Turn. (33)
(See Photos 1 & 2)
Row 11 – Dc2tog, Dc 12, *Ch 1, Sk 1, Dc in gap*, repeat between ** again, Ch 1, Sk 1, Dc 12, Dc2tog, Ch 2, Turn. (31)
Row 12 – Dc2tog, Dc 10, *Ch 1, Sk 1, Dc in gap*, repeat between ** twice more, Ch 1, Sk 1, Dc 10, Dc2tog, Ch 2, Turn. (29)
Row 13 – Dc2tog, Dc 8, * Ch 1, Sk 1, Dc in gap*, repeat between ** 3 more times, Ch 1, Sk 1, Dc 8, Dc2tog, Ch 2, Turn. (27)
Row 14 – Dc2tog, Dc, 6, *Ch 1, Sk 1, Dc in gap*, repeat between ** 4 more times, Ch, 1, Sk 1, Dc 6, Dc2tog, Ch 2, Turn. (25)
Row 15 – Dc2tog, Dc 4, * Ch 1, Sk 1, Dc in gap*, repeat between ** 5 more times, Ch 1, Sk 1, Dc 4, Dc2tog, Ch 2, Turn. (23)
Row 16 – Dc2tog, Dc 2, * Ch 1, Sk 1, Dc in gap*, repeat between ** 6 more times, Ch 1, Sk 1, Dc 2, Dc2tog, Ch 2, Turn. (21)
Row 17 – Dc2tog, Dc 17, Dc2tog, Tie off. (19)
Edging
Turn top upside down and join in the first stitch on the right. Ch 2.
Row 1 – Dc all stitches in original foundation row, Ch 2, Turn. (55)
Row 2 – Dc all, Ch 1, Turn (55)
Row 3 – *Sc, Sk 2, (Dc 4, Ch 2, Dc 4) in same stitch, Skip 2*, Repeat between ** 8 more times, end with an Sc.
(See Photos 3 & 4)
Ties
To create the ties, create a single crochet chainless foundation stitch until the stitch is 24 inches long.
To attach to the bodice, insert hook into chain as if to start creating another foundation stitch, YO, pull up loop, YO and pull through first loop on hook – You will have 2 loops on hook.
With right side up, insert hook into the stitch in the top left corner of the top, YO, pull up loop, YO and pull through first 2 loops on hook. Insert hook back into same stitch in the top, YO, pull up loop, YO and pull through all 3 loops on the hook.
Insert hook into next stitch down the side of the top and continue to Sc down the edge of the top until you reach row 1 of the Top Panel. (See Photo 5)
To separate from top into tie - Insert hook back into the last stitch you did a Sc in, YO and pull up loop. YO and Pull through 1 loop, YO and pull through both loops. You will now see you have the beginning of a foundation stitch ready for you to create your second tie from.
(See Photo 6)
Continue chainless foundation stitch until tie is 24 inches long. Repeat on the other side, starting at the right bottom corner of the top and working up the other side. Weave in your ends.
Fringe
Cut 36 lengths (=4 lengths for each point. For fuller tassels, cut 5 lengths per point) at 2x the length you want your tassels to be. My lengths measure 22cm. Take 4 lengths, fold in half and use your hook to pull through the gap in the point of your edging. Pull the ends through this loop and pull tight to secure. Repeat for each point. Trim the ends to neaten up.
(See Photos 7 - 10)
And you are Finished!
Size 4-6y
Top Panel
Row 1 – Using the Single Crochet Chainless Foundation Stitch, Stich 67 stitches across, Ch 2, Turn. (67)
Row 2 - 4 – Dc2tog, Dc2tog, Dc until last 4 St’s, Dc2tog, Dc2tog, Ch 2, Turn. (55)
Row 5 - 11 – Dc2tog, Dc until last 2 St, Dc2tog, Ch 2, Turn. (41)
Row 12 – Dc2tog, Dc 18, Ch 1, Sk 1, Dc 18, Dc2tog, Ch 2, Turn. (39)
Row 13 – Dc2tog, Dc 16, Ch 1, Sk 1, Dc in Ch gap from previous Row, Ch 1, Sk 1, Dc 16, Dc2tog, Ch 2, Turn. (37)
(See Photos 1 & 2)
Row 14 – Dc2tog, Dc 14, *Ch 1, Sk 1, Dc in gap*, repeat between ** again, Ch 1, Sk 1, Dc 14, Dc2tog, Ch 2, Turn. (35)
Row 15 – Dc2tog, Dc 12, *Ch 1, Sk 1, Dc in gap*, repeat between ** twice more, Ch 1, Sk 1, Dc 12, Dc2tog, Ch 2, Turn. (33)
Row 16 – Dc2tog, Dc 10, * Ch 1, Sk 1, Dc in gap*, repeat between ** 3 more times, Ch 1, Sk 1, Dc 10, Dc2tog, Ch 2, Turn. (31)
Row 17 – Dc2tog, Dc, 8, *Ch 1, Sk 1, Dc in gap*, repeat between ** 4 more times, Ch, 1, Sk 1, Dc 8, Dc2tog, Ch 2, Turn. (29)
Row 18 – Dc2tog, Dc 6, * Ch 1, Sk 1, Dc in gap*, repeat between ** 5 more times, Ch 1, Sk 1, Dc 6, Dc2tog, Ch 2, Turn. (27)
Row 19 – Dc2tog, Dc 4, * Ch 1, Sk 1, Dc in gap*, repeat between ** 6 more times, Ch 1, Sk 1, Dc 4, Dc2tog, Ch 2, Turn. (25)
Row 20 – Dc2tog, Dc 2, * Ch 1, Sk 1, Dc in gap*, repeat between ** 7 more times, Ch 1, Sk 1, Dc 2, Dc2tog, Ch 2, Turn. (23)
Row 21 – Dc2tog, Dc 19, Dc2tog, Tie off. (21)
Edging
Turn top upside down and join in the first stitch on the right. Ch 2.
Row 1 – Dc all stitches in original foundation row, Ch 2, Turn. (67)
Row 2 – Dc all, Ch 1, Turn (67)
Row 3 – *Sc, Sk 2, (Dc 4, Ch 2, Dc 4) in same stitch, Skip 2*, Repeat between ** 10 more times, end with an Sc.
(See Photos 3 & 4)
Ties
To create the ties, create a single crochet chainless foundation stitch until the stitch is 27 inches long.
To attach to the bodice, insert hook into chain as if to start creating another foundation stitch, YO, pull up loop, YO and pull through first loop on hook – You will have 2 loops on hook.
With right side up, insert hook into the stitch in the top left corner of the top, YO, pull up loop, YO and pull through first 2 loops on hook. Insert hook back into same stitch in the top, YO, pull up loop, YO and pull through all 3 loops on the hook.
Insert hook into next stitch down the side of the top and continue to Sc down the edge of the top until you reach row 1 of the Top Panel. (See Photo 5)
To separate from top into tie - Insert hook back into the last stitch you did a Sc in, YO and pull up loop. YO and Pull through 1 loop, YO and pull through both loops. You will now see you have the beginning of a foundation stitch ready for you to create your second tie from. (See Photo 6)
Continue chainless foundation stitch until tie is 27 inches long. Repeat on the other side, starting at the right bottom corner of the top and working up the other side. Weave in your ends.
Fringe
Cut 55 lengths (5 lengths for each point) at 2x the length you want your tassles to be. My lengths measure 22cm. Take 5 lengths, fold in half and use your hook to pull through the gap in the point of your edging. Pull the ends through this loop and pull tight to secure. Repeat for each point. Trim the ends to neaten up.
(See Photos 7 - 10)
And you are Finished!
Size 7-10y
Top Panel
Row 1 – Using the Single Crochet Chainless Foundation Stitch, Stich 85 stitches across, Ch 2, Turn. (85)
Row 2 - 5 – Dc2tog, Dc2tog, Dc until last 4 St’s, Dc2tog, Dc2tog, Ch 2, Turn. (69)
Row 6 - 15 – Dc2tog, Dc until last 2 St, Dc2tog, Ch 2, Turn. (49)
Row 16 – Dc2tog, Dc 22, Ch 1, Sk 1, Dc 22, Dc2tog, Ch 2, Turn. (47)
Row 17 – Dc2tog, Dc 20, Ch 1, Sk 1, Dc in Ch gap from previous Row, Ch 1, Sk 1, Dc 20, Dc2tog, Ch 2, Turn. (45)
(See Photos 1 & 2)
Row 18 – Dc2tog, Dc 18, *Ch 1, Sk 1, Dc in gap*, repeat between ** again, Ch 1, Sk 1, Dc 18, Dc2tog, Ch 2, Turn. (43)
Row 19 – Dc2tog, Dc 16, *Ch 1, Sk 1, Dc in gap*, repeat between ** twice more, Ch 1, Sk 1, Dc 16, Dc2tog, Ch 2, Turn. (41)
Row 20 – Dc2tog, Dc 14, * Ch 1, Sk 1, Dc in gap*, repeat between ** 3 more times, Ch 1, Sk 1, Dc 14, Dc2tog, Ch 2, Turn. (39)
Row 21 – Dc2tog, Dc 12, *Ch 1, Sk 1, Dc in gap*, repeat between ** 4 more times, Ch 1, Sk 1, Dc 12, Dc2tog, Ch 2, Turn. (37)
Row 22 – Dc2tog, Dc 10, * Ch 1, Sk 1, Dc in gap*, repeat between ** 5 more times, Ch 1, Sk 1, Dc 10, Dc2tog, Ch 2, Turn. (35)
Row 23 – Dc2tog, Dc, 8, *Ch 1, Sk 1, Dc in gap*, repeat between ** 6 more times, Ch, 1, Sk 1, Dc 8, Dc2tog, Ch 2, Turn. (33)
Row 24 – Dc2tog, Dc 6, * Ch 1, Sk 1, Dc in gap*, repeat between ** 7 more times, Ch 1, Sk 1, Dc 6, Dc2tog, Ch 2, Turn. (31)
Row 25 – Dc2tog, Dc 4, * Ch 1, Sk 1, Dc in gap*, repeat between ** 8 more times, Ch 1, Sk 1, Dc 4, Dc2tog, Ch 2, Turn. (29)
Row 26 – Dc2tog, Dc 2, * Ch 1, Sk 1, Dc in gap*, repeat between ** 9 more times, Ch 1, Sk 1, Dc 2, Dc2tog, Ch 2, Turn. (27)
Row 27 – Dc2tog, Dc 23, Dc2tog, Tie off. (25)
Edging
Turn top upside down and join in the first stitch on the right. Ch 2.
Row 1 – Dc all stitches in original foundation row, Ch 2, Turn. (85)
Row 2 – Dc all, Ch 1, Turn (85)
Row 3 – *Sc, Sk 2, (Dc 4, Ch 2, Dc 4) in same stitch, Skip 2*, Repeat between ** 13 more times, end with an Sc.
(See Photos 3 & 4)
Ties
To create the ties, create a single crochet chainless foundation stitch until the stitch is 27 inches long.
To attach to the bodice, insert hook into chain as if to start creating another foundation stitch, YO, pull up loop, YO and pull through first loop on hook – You will have 2 loops on hook.
With right side up, insert hook into the stitch in the top left corner of the top, YO, pull up loop, YO and pull through first 2 loops on hook. Insert hook back into same stitch in the top, YO, pull up loop, YO and pull through all 3 loops on the hook.
Insert hook into next stitch down the side of the top and continue to Sc down the edge of the top until you reach row 1 of the Top Panel.
(See Photo 5)
To separate from top into tie - Insert hook back into the last stitch you did a Sc in, YO and pull up loop. YO and Pull through 1 loop, YO and pull through both loops. You will now see you have the beginning of a foundation stitch ready for you to create your second tie from.
(See Photo 6)
Continue chainless foundation stitch until tie is 27 inches long. Repeat on the other side, starting at the right bottom corner of the top and working up the other side. Weave in your ends.
Fringe
Cut 70 lengths (5 lengths for each point) at 2x the length you want your tassles to be. My lengths measure 24cm. Take 5 lengths, fold in half and use your hook to pull through the gap in the point of your edging. Pull the ends through this loop and pull tight to secure. Repeat for each point. Trim the ends to neaten up.
(See Photos 7 - 10)
And you are Finished!
Photos!
1. 
2. 
3. 
4. 
5. 
6. 
7. 
8. 
9. 
10. 